So most of my Dupes are for MAC, but I do have 2 NARS lipsticks in here. I hope you enjoy and get to save some money on your lipstick choices now!
Wednesday, June 26, 2013
Wednesday, June 12, 2013
Drugstore Dupes for High End Makeup / The Face - Blush
I was really pleased with the dupes from my blushes!! These are a fraction of the price for the EXACT same color payoff! I will be doing more blushes as I come across them. So look out for more dupes to come!!
Tuesday, June 11, 2013
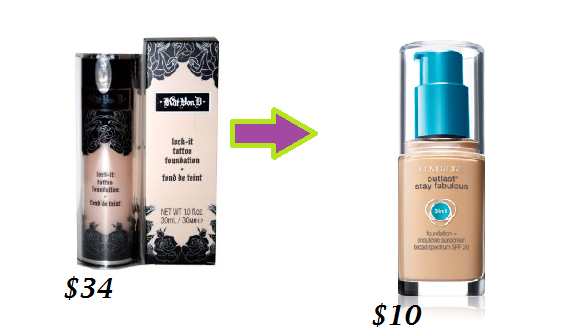
Drugstore Dupes for High end Makeup - The Face / Primer & Foundations
Ok so I have been really searching for perfect match dupes! And Some of these I feel work better than the High end products! Look for the Rest of the Dupes this Week!!!
PRIMER
PRIMER
FOUNDATIONS
Monday, June 3, 2013
$20 Dollar Makeup Challenge!
OK ladies this was not an easy task! But I think I got some good stuff! All the products I bought were from NYC New York Color. I purchased the Smooth skin liquid makeup foundation in 679 Soft Beige, Its not a bad product by any means. Its not sticky or tacky, its a light coverage but VERY buildable. The only thing with this product is you MUST shake it really well. If they put this in a pump bottle instead it would be much easier to get to, because it almost has a whipped consistency. I did dampen the sponge before I applied the foundation just to try and get a more full coverage. I then used the Smooth Skin bronzing face powder in 704A Warm Beige. There is NOTHING bronzing about this powder, its just a pressed face powder. I have to say this is VERY mattifying, which I look for in my powders. A little goes a long way though, because it is very powdery. For my blush I used the Cheek Glow in 656 Sutton Place Peach, I had to use the blush brush it came with since there was no way I could have picked up a blush brush and still stayed in my budget. I had to really pack it on to even show a hint of color, this might have something to do with the color of my skin and it blended to much. For my eyeshadow I purchased the HD Color Trio in 784 Late Night Latte. I used my fingers to apply the shadow and also to blend it. I used the purple color in the middle all over my eye...then the champagne color for my highlight and lastly the brown for my crease. I tried to blend as best as possible using my fingers, but NOTHING compares to a blending eyeshadow brush. That is really the BEST investment in your makeup collection...an amazing blending brush. OK back on track...I also had to use the brown for my eyebrows. It has some shimmer in it, but it didn't really pick up in my eyebrows. And I still totally prefer a pencil for my eyebrows to line them with then color them in with powder, but again that would not work in the budget. Next I used a double sided eyeliner pencil, the one side was black and the other was white. The color was 880 Mockingbird. I lined my bottom and top lash line with the black, then used the shimmer white for my bottom waterline. Now as you ALL know I love mascara, and for this budget I was unable to purchase 5 different kinds of mascara to get my desired look. But I did use Sky Rise in 842 Extreme Black, and I put on a few coats of it and it wasn't bad. I actually really like this mascara and will be adding it to my daily routine. And lastly my lips...I did not used a lip liner but I did get a great shimmery powdery pink color. It is 314 Petal, I used it alone for this look but I can definitely use it again. I can add it on top of a more vivid pink to tone it down a little. Its a great color and it isn't drying or sticky, and because my obsession with not being able to wear anything that doesn't smell good it was a winner!!
Tuesday, May 21, 2013
Palmolive® soft touch™
I have tried Palmolive before in the past, and never found it to be something I would recommend, then I was sent this in the mail to do a review about. My first impression was the way they designed the bottle, its nice looking and fits perfectly in your hand. The smell is AMAAAAZING...especially the cocoa butter one. It just smells like summer! So I cooked a large dinner so I had a dish full of dishes so I could really see it put to use. I put the same amount that I normally use of my Dawn dish soap so I could really do a fair comparison. The soap soaked into the sponge right away, which worried me that it was going to be very watery and not last for an entire load of dishes. Boy was I wrong!! The little bit that I put on the sponge lasted the whole time...and I could have done more! My hands were not left dry or tight feeling. I used the pink bottle with Vitamin E and really did love it! I really think that after my bottles of Palmolive Soft Touch is out...I will be picking this up again!
I received these products complimentary from Influenster for testing purposes.
Wednesday, May 8, 2013
DIY With Coconut Oil
So as I promised I will give you step by step on how to make your own natural goodies with coconut oil. Below I put links on where you can get containers for each DIY project as well as the essential oils, beeswax and shea butter.
BUG REPELLENT
This recipe makes about 1/2 cup or 4oz. You can easily double this depending on how much you need for you and/or your family. This makes a very soft balm which makes the application easy, if you prefer something more firm you can easily add more beeswax. I have found that 2oz jars (I have attached a link on where to get them below) are the most convenient size, they fit in any purse, backpack and even a diaper bag. But if you have an empty jar around the house feel free to use that.
INGREDIENTS:
1/4 cup coconut oil
1/8 cup shea butter
4 tsp. beeswax granules
12 drops citronella essential oil
8 drops rosemary essential oil
8 drops cedar wood essential oil
8 drops lemongrass essential oil
8 drops eucalyptus or tee tree essential oil
TOOLS:
Jar(s) for finished balm
Metal Whisk
Metal Spoon
Double Boiler
INSTRUCTIONS:
Bring the water in your double boiler to a boil and then lower the heat to medium-low. Now add your coconut oil and shea butter and let the two melt while whisking together. Add the beeswax and whisk in the granules in to the coconut oil and shea butter mixture, until it is completely melted.
Remove the pan from the heat, let the liquid cool for about 5 minutes and then whisk in the essential oils. Make sure you whisk it well to ensure everything is combined. Poor the liquid into your jar(s), let cool uncovered at room temperature before putting the cap on.
LOTION BAR
A lotion bar is not intended on being used in the shower, you can but that's not how its normally used. You just rub the bar until its warm and then apply it on your skin like a lotion. I have found keeping then in tins is convenient and also a great way to dress them up to give as gifts.
INGREDIENTS:
Coconut Oil (1 part)
Pure Beeswax (1 part)
Essential Oils (optional)
TOOLS:
Saucepan
Lotion Mold
INSTRUCTIONS:
Heat coconut oil and beeswax together in a saucepan over low heat. Because the beeswax takes a while to melt down it helps if you break it up into small chunks. Once the coconut oil and beeswax are melted you can add in whatever scents you prefer in the form of your essential oils.
Pour the melted mixture into lotion bar molds, let them sit out until cool. If you need to speed the process up a bit you can put them in the refrigerator. After they are cool you can pop out the molds and place them inside the tins, and they are ready to use.
SUNSCREEN
This sunscreen is somewhat but not completely waterproof, so you should still reapply after swimming or even after sweating a lot. Also a VERY important note...make sure you do not inhale the Zinc Oxide
INGREDIENTS:
1/2 cup almond oil, can also use olive oil
1/4 cup coconut oil
1/4 cup beeswax
2 tbsp zinc oxide
1 tsp vitamin E oil (optional)
2 tbsp shea butter (optional)
Essential oils for fragrance (optional)
TOOLS:
Glass jar
Plastic container to keep sunscreen in
Saucepan
Metal spoon
INSTRUCTIONS:
Combine all ingredients except for the zinc oxide in a pint sized or larger glass jar. You can use a mason jar or even an old pickle jar. Fill the saucepan with a few inches of water and place over medium heat. Put a lid on the jar loosely and place it in the saucepan filled with water. As the water heats the ingredients in the jar will start to melt, shake or stir occasionally. When all ingredients are completely melted add the zinc oxide, stir in well and then pour into whatever container you will be using. It does not pump very well in a lotion pump though. As it begins to cool make sure you really mix it up to make sure the zinc oxide is really mixed in. You use this as you would normal sunscreen, it is best if used within 6 months.
For Lotion Bar Molds Click HERE
For Lotion Bar Tins Click HERE
For Bug Repellent Jars Click HERE
For Sunscreen Tube Click HERE
Essential Oils Click HERE
Shea Butter Click HERE
Beeswax Click HERE
BUG REPELLENT
This recipe makes about 1/2 cup or 4oz. You can easily double this depending on how much you need for you and/or your family. This makes a very soft balm which makes the application easy, if you prefer something more firm you can easily add more beeswax. I have found that 2oz jars (I have attached a link on where to get them below) are the most convenient size, they fit in any purse, backpack and even a diaper bag. But if you have an empty jar around the house feel free to use that.
INGREDIENTS:
1/4 cup coconut oil
1/8 cup shea butter
4 tsp. beeswax granules
12 drops citronella essential oil
8 drops rosemary essential oil
8 drops cedar wood essential oil
8 drops lemongrass essential oil
8 drops eucalyptus or tee tree essential oil
TOOLS:
Jar(s) for finished balm
Metal Whisk
Metal Spoon
Double Boiler
INSTRUCTIONS:
Bring the water in your double boiler to a boil and then lower the heat to medium-low. Now add your coconut oil and shea butter and let the two melt while whisking together. Add the beeswax and whisk in the granules in to the coconut oil and shea butter mixture, until it is completely melted.
Remove the pan from the heat, let the liquid cool for about 5 minutes and then whisk in the essential oils. Make sure you whisk it well to ensure everything is combined. Poor the liquid into your jar(s), let cool uncovered at room temperature before putting the cap on.
LOTION BAR
A lotion bar is not intended on being used in the shower, you can but that's not how its normally used. You just rub the bar until its warm and then apply it on your skin like a lotion. I have found keeping then in tins is convenient and also a great way to dress them up to give as gifts.
INGREDIENTS:
Coconut Oil (1 part)
Pure Beeswax (1 part)
Essential Oils (optional)
TOOLS:
Saucepan
Lotion Mold
INSTRUCTIONS:
Heat coconut oil and beeswax together in a saucepan over low heat. Because the beeswax takes a while to melt down it helps if you break it up into small chunks. Once the coconut oil and beeswax are melted you can add in whatever scents you prefer in the form of your essential oils.
Pour the melted mixture into lotion bar molds, let them sit out until cool. If you need to speed the process up a bit you can put them in the refrigerator. After they are cool you can pop out the molds and place them inside the tins, and they are ready to use.
SUNSCREEN
This sunscreen is somewhat but not completely waterproof, so you should still reapply after swimming or even after sweating a lot. Also a VERY important note...make sure you do not inhale the Zinc Oxide
INGREDIENTS:
1/2 cup almond oil, can also use olive oil
1/4 cup coconut oil
1/4 cup beeswax
2 tbsp zinc oxide
1 tsp vitamin E oil (optional)
2 tbsp shea butter (optional)
Essential oils for fragrance (optional)
TOOLS:
Glass jar
Plastic container to keep sunscreen in
Saucepan
Metal spoon
INSTRUCTIONS:
Combine all ingredients except for the zinc oxide in a pint sized or larger glass jar. You can use a mason jar or even an old pickle jar. Fill the saucepan with a few inches of water and place over medium heat. Put a lid on the jar loosely and place it in the saucepan filled with water. As the water heats the ingredients in the jar will start to melt, shake or stir occasionally. When all ingredients are completely melted add the zinc oxide, stir in well and then pour into whatever container you will be using. It does not pump very well in a lotion pump though. As it begins to cool make sure you really mix it up to make sure the zinc oxide is really mixed in. You use this as you would normal sunscreen, it is best if used within 6 months.
For Lotion Bar Molds Click HERE
For Lotion Bar Tins Click HERE
For Bug Repellent Jars Click HERE
For Sunscreen Tube Click HERE
Essential Oils Click HERE
Shea Butter Click HERE
Beeswax Click HERE
Monday, May 6, 2013
Summer Time With Coconut Oil
So the newest and latest thing is Coconut Oil! I really wish I new what took the world so long to realize just how amazing it is and how many different uses it really has. I'm going to list a few things that I know it can be used for, I will do another blog on how to make some of the things. With summer coming you really should go buy a jar of the infamous coconut oil because you will really find it comes in handy!
- On the skin for lotion
- Homemade lotion bars
- Eye-makeup remover
- Rub on age spots to lighten them
- Prevents stretch marks during pregnancy
- Sunscreen, helps avoid burning
- Massage oil
- Can boost metabolism
- Tiny bit rubbed through hair will get rid of frizz
- Intensive night time moisturizer
- Sugar scrub for the shower
- Natural chap stick
- Intensive hair conditioner
- Has been shown to sooth psoriasis and eczema
- Rub on the inside of your nose to help allergy symptoms
- Homemade bug repellent lotion bars
- Can help the appearance of varicose veins
- Speeds healing of sunburns
- Use as a shaving cream and an after shave lotion
- Helps resolve acne when used regularly
- When rubbed in scalp daily it can stimulate hair growth
- Helps nails grow when rubbed on your cuticles
- Soothing body butter
Subscribe to:
Posts (Atom)